

How to Fix Your Pole Set
Have you ever come back to camp after a long day on the trail to find your tent toppled and your pole set a mess of shock cord and poles? Hopefully, the answer is no. But sometimes that storm or rogue wind gust can take a toll on your little home-away-from-home.
Luckily, our team here at NEMO has planned for the worst and your tent includes a pole splint within your pole bag. Here’s what you’ll need to do to get through the rest of your trip:
- Locate pole splint and locate the broken pole segment in your pole set.
- Slide the pole splint up the poles until it’s covering the broken pole segment.
- Use duct tape or repair tape to secure the pole splint securely to the pole set.
- Use pole set until you’re able to get home for a more in-depth repair.
- For a quick tutorial, watch our video here.
At-Home Repair
Once you’re home, get in contact with our customer service team. Luckily, pole segments are replaceable so you won't have to replace the whole pole set. You can either give us a call at 800-997-9301 or you can request a pole segment using our Spare Parts Request Form.
Either way, they’re happy to help you get your pole set back to full function for your next adventure. Pole set repairs can be a bit intimidating if you’ve never disassembled one before, but as long as you stay organized, it should be an easy and quick process.
First, our team will send a pole chart by email to confirm which pole segment you’re in need of. This chart can also be used to stay organized once you’ve received the new pole segment and you are ready for the repair.
Once you’ve received the new pole segment, follow the step-by-step process below for replacing it in your pole set:
1. Unscrew the ball cap from the pole end nearest to the damaged segment. Next, unhook the ball cap from the shock cord.
 Unscrew the ball cap from the pole and remove it from the shock cord.
2. Untie the shock cord loop so that you can easily feed the shock cord through the poles.
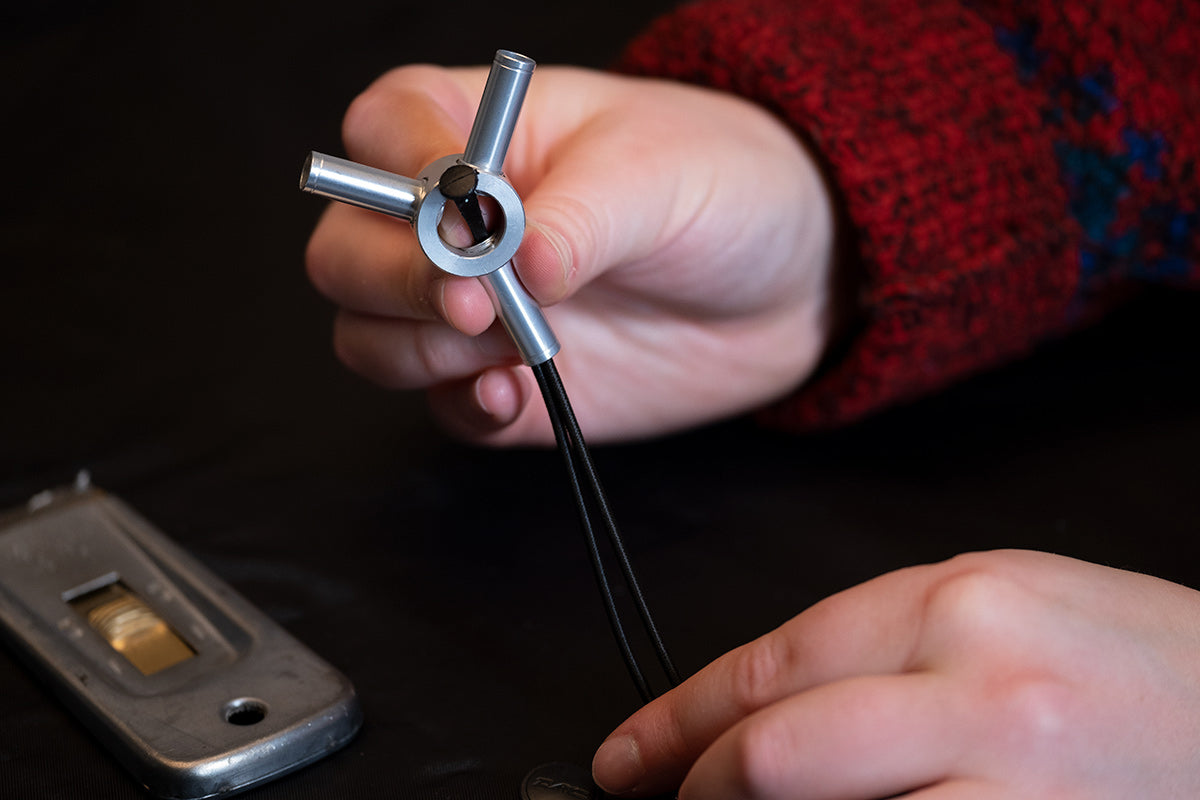
 This three-pronged hub is used in many NEMO tents and connects the shock cord to the hub using a small black clip that can be pulled out of the center of the hub.
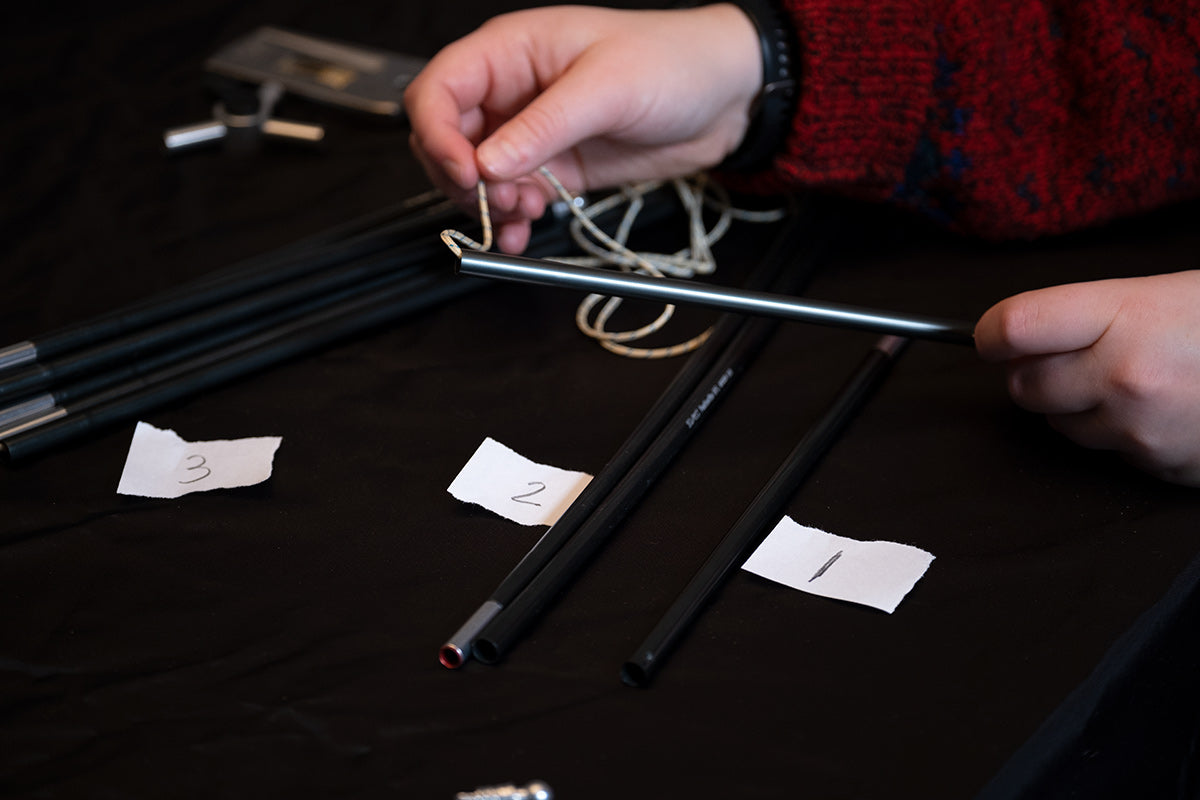 Numbered paper can help keep the poles in order, it's important to keep them in the correct order.
3. Label your pole segments. You can write out a number on a sheet of paper (or directly on the pole itself in marker) and label the poles accordingly as they come off the shock cord. This will be very important, the order of the poles on the shock cord does matter.
4. Once you’ve arrived at the broken segment and have replaced the broken one with the new one, you can start feeding the shock cord back through the numbered segments in the correct order.
5. Keep a tight hold on that shock cord, it’s known for slipping through your fingers!
6. Tie off a loop once you feed the cord through the last pole and connect it to the ball cap.
7. Screw the cap back into the end pole.
Special Instructions: Hubs
If you have a broken pole segment where you need to remove the shock cord from a central hub, here’s the best method for getting the hub back in order.
This three-pronged hub is used in many NEMO tents and connects the shock cord to the hub using a small black clip that can be pulled out of the center of the hub.
Three-Pronged Hub: The Dagger, Aurora, Hornet, Hornet Elite, Firefly, and Dragonfly all have this hub. One section, the ridge pole of the tent, is connected by a small black clip that attaches the shock cord to the hub.
The easiest way to remove this black clip is to:
1. Use a sharp blade to get under the lip of the black hub covering to access the shock cord of your pole set. It should pop off of the hub, we recommend removing both sides.
 Gently get a blade under the lip of the hub covering and lift to remove the cover.
2. Remove the shock cord from the black clip by pulling it completely free of the hub. This will help loosen the clip enough to get it out.
3. Using a finger or a pen, pull the black clip out of the leg of the hub through the small middle opening of the hub. This clip can be difficult to pull out, so we recommend using a pen to push the clip through one side of the middle hub opening — don't be afraid to apply pressure, the clip is very durable.
 Using a pen or your finger, work the black clip out of the center of the hub with the shock cord.
4. You should then be able to work it out far enough to grab the end with your fingers.
5. Once you’ve completed your pole set repair, feed a loop of shock cord through the hub leg until it pokes out of the middle of the hub.
6. Attach the black clip to the loop and then pull the clip and shock cord back through the hub until it’s back in place.
7. Tie off the shock cord where it won’t be too close to the end of the pole.
 Feed the shock cord through the hub as a loop, then attach the black clip to the shock cord and pull the clip back into place in the hub.
Loose Shock Cord? No Problem!
With use, shock cord can lose its elasticity over time. It’s important to update the shock cord in your pole set when you start to notice fraying, loss of elasticity, and when the poles don’t fit together correctly. You can find shock cord at most outdoor stores or online. You can also contact us directly for your shock cord needs.
Once you have new shock cord, you’ll want to follow the directions above for breaking down your pole set. It’s best to stay organized by numbering your segments and keeping a tight hold on the shock cord.
Have any questions? Reach out to our Customer Service Team here.